DISCLAIMER: I am not responsible if you incorrectly install a serpentine belt and you damage your car. If you do not feel comfortable performing this repair, pay the extra money to have the belt changed. The purpose of this article is to show that replacement is not as daunting of a task as it may at first appear. I also do not claim ownership of the pictures and diagrams in the article.
You hop in your car on your way to go somewhere, and as you are backing out of your driveway you continually hear a constant squeaking coming from the car engine area. The squeaking can have multiple sources, so you take the car to the repair shop and they tell you that your serpentine belt is worn and needs replacing. Next, they tell you that the total cost will be around $130.00 to change the belt. Unless you are someone who can't get your hands a little dirty, it will generally make good sense to change the belt yourself. On a car like mine (a 2005 Toyota Corolla), it's fairly easy to complete, takes only about 15 minutes, and will only cost you around $30.00. I have changed the belt on both of our cars multiple times over the last several years, and have saved at least $400.00 on replacement costs (two replacements for each car). Below are instructions on how to change the belt yourself and save $$.
1. Check to see if the belt is worn. The belt should look like this.
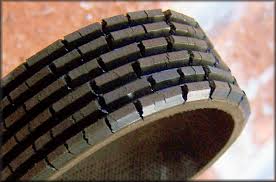
You will see that the grooves have cracks in them. This is when you know it is time to replace the belt.
2. Visit any auto parts store and
RENT a serpentine belt tool (some use a socket wrench, but I prefer the tool as it has a longer handle for greater leverage) shown below.

I normally visit AutoZone, but most auto parts stores will have a similar program. They will charge you the $30.00 for the tool, and once you complete the replacement, you can return the tool for a full refund. This is offered under their "rent-a-tool" program. While you are at the auto parts store, go ahead and pick up the new belt. The auto parts store should be able to assist you in finding the correct belt. I normally opt for the more expensive belt at around $30.00 as I feel that since I am already saving money by performing the belt change myself, I can splurge a little on the quality of the belt.
3. Once back home, wait for the car to cool. It is no fun burning yourself on a hot car.
4. VERY IMPORTANT: Draw a diagram of your current serpentine belt's path (as each vehicle's can be different).

It's a bad day if you have to figure out how to snake the new belt without the use of a diagram.
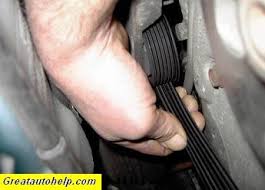
5. Place the rented serpentine belt tool on the stationary nut (known as the drive belt tensioner bracket) and pull down on the tool's handle to release belt tension as shown below.

Different vehicles have different places where this nut is located.
6. With the tension loosened, remove the old belt.
7. Snake new belt using the diagram you drew that follows the same path as the old serpentine belt. This is probably the most tricky part as some vehicles provide you with more room to feed the belt around the wheels than others. My Corolla doesn't give me much room.
8. Use the tool to assist in slipping the belt over the last wheel, and ensure the belt is positioned correctly. The belt should be tight. If it is not, then you have it on incorrectly or you purchased the wrong sized belt. The wheels will either have a smooth side or be grooved. The grooves on the belt should be matched and facing the grooves on the wheel and the wheels with the smooth surface should be matched with the smooth side of the belt (shown below).
9. Crank up the car and hope you did it right!
10. Don't forget to return the tool to get your $30.00 back!
If you find yourself have a little trouble at first or if you are slightly uncomfortable completing the task, search on YouTube how to change the serpentine belt on your particular vehicle as a confidence booster.
This is one way that we have been able to save over the last few years. Hope you find the article useful.
Happy Saving!
-PennyPinchingPaul